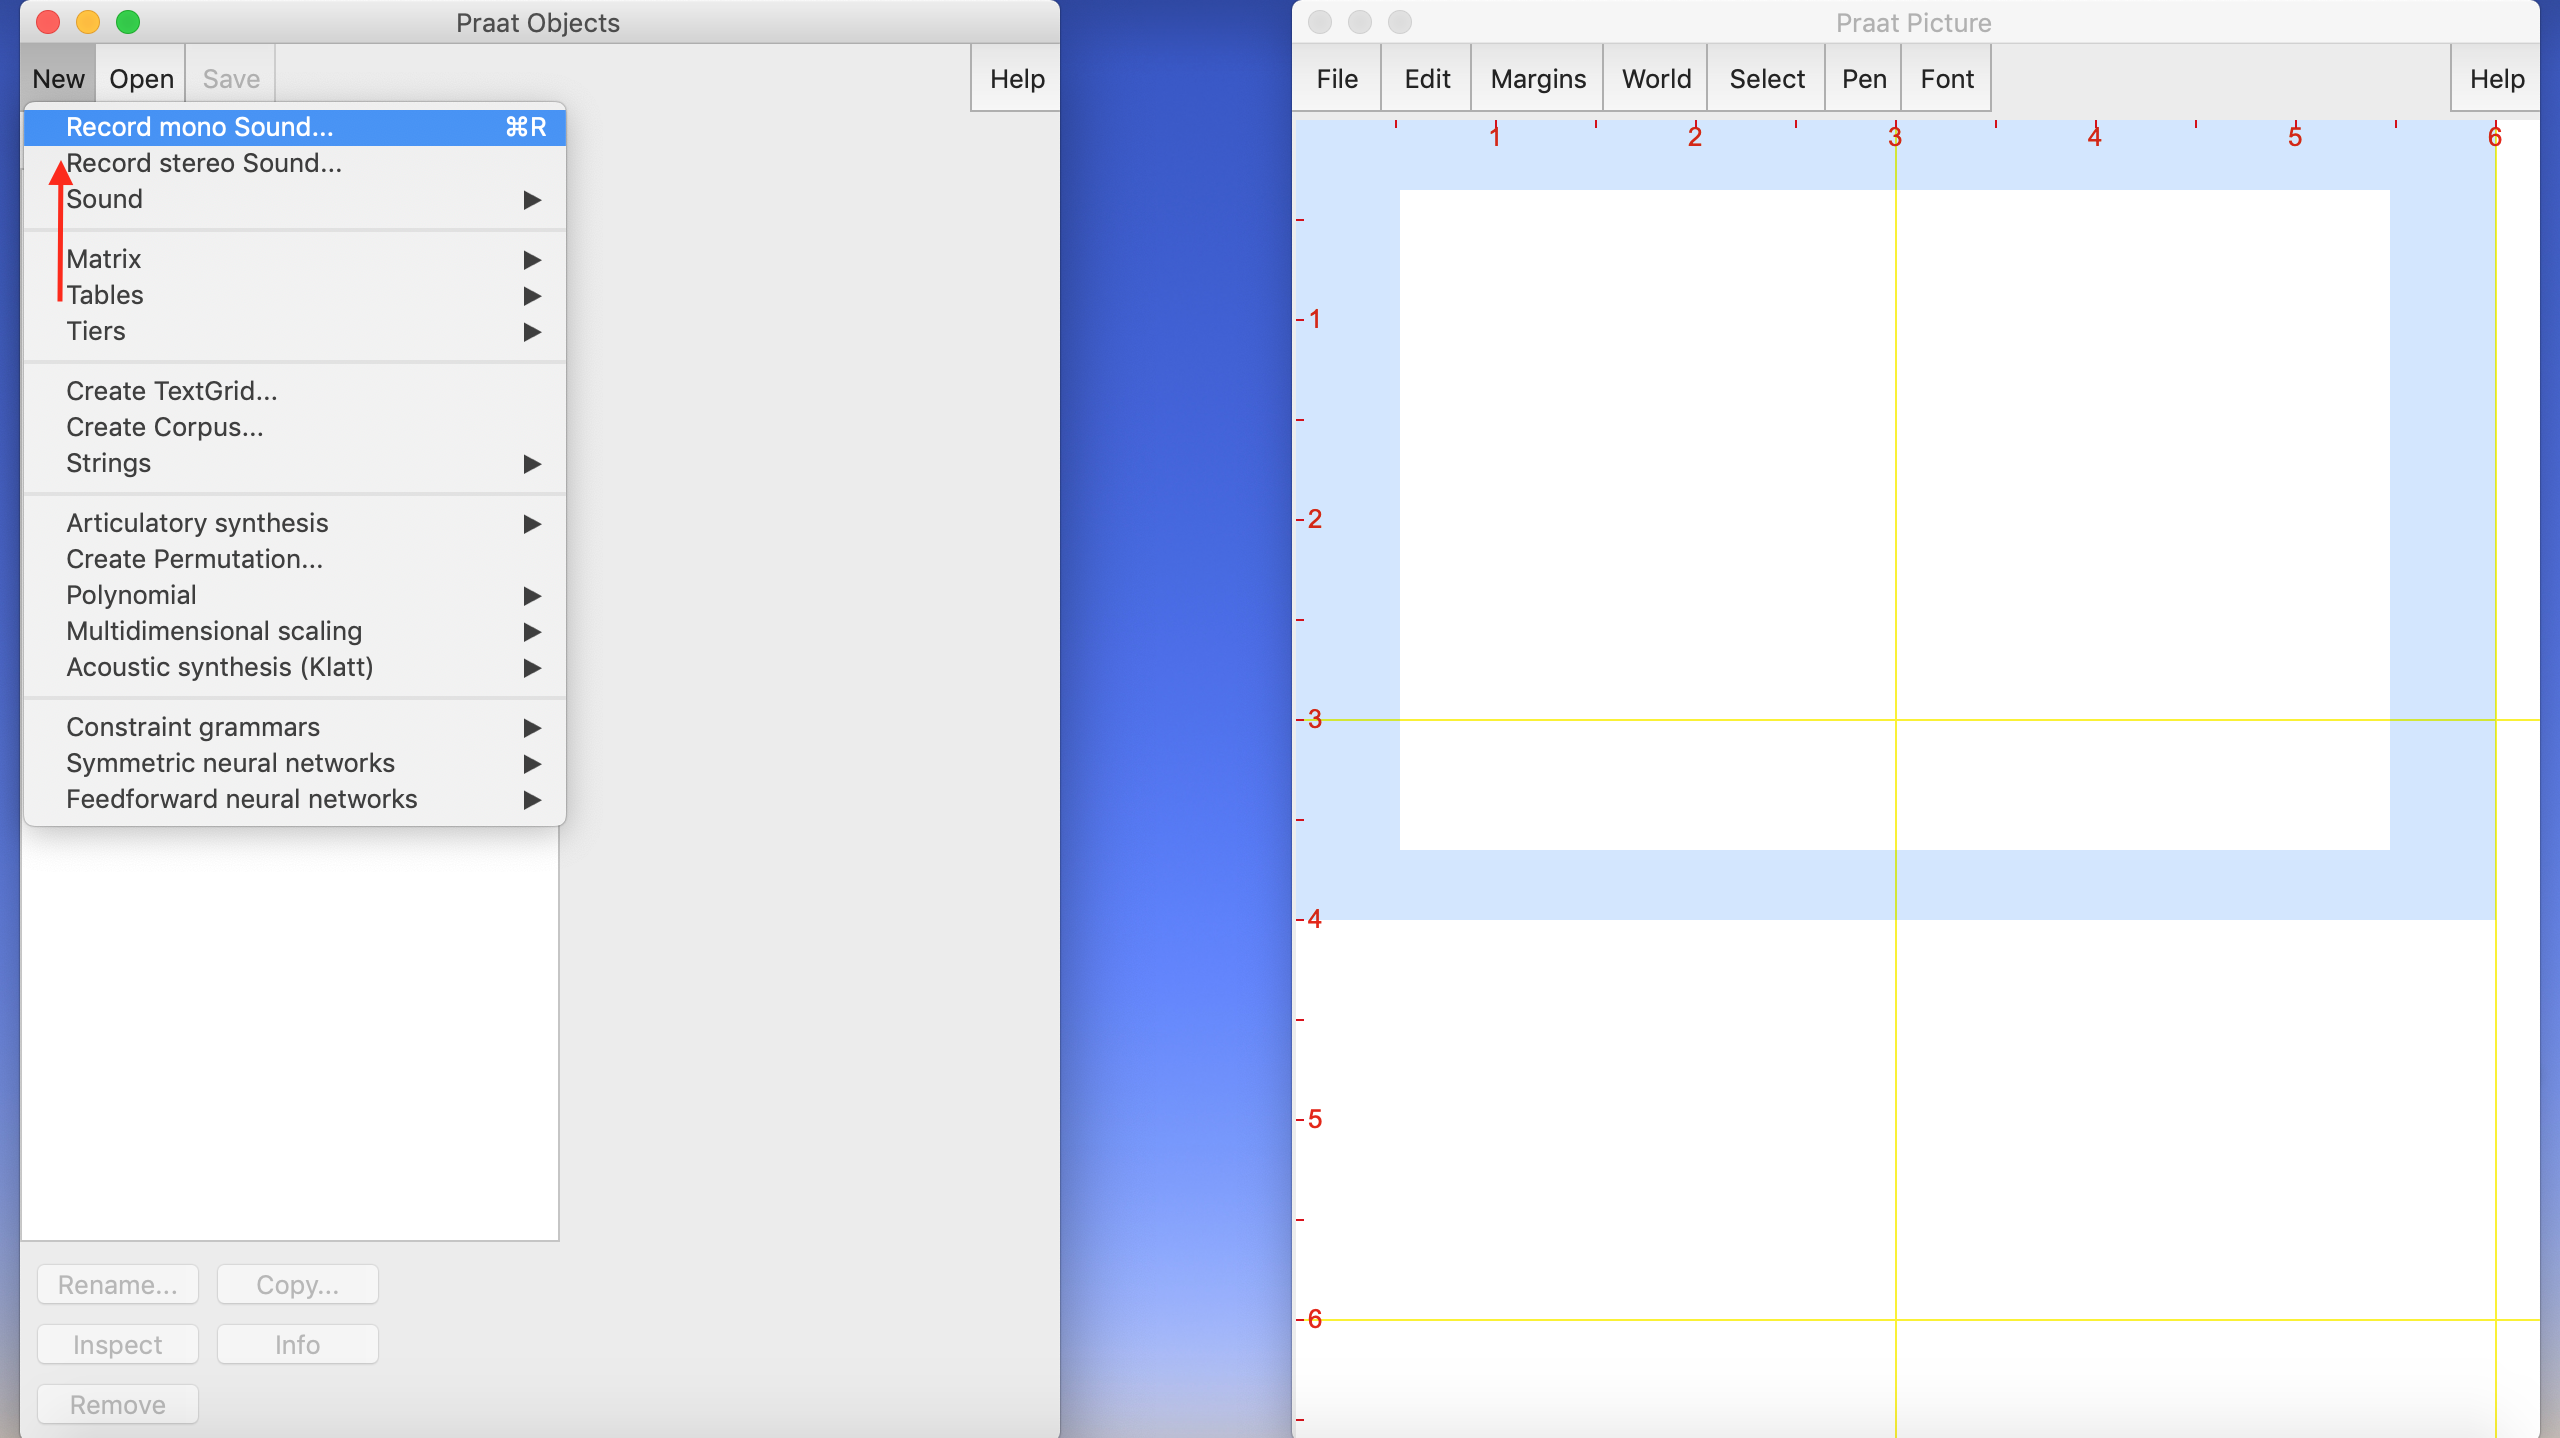
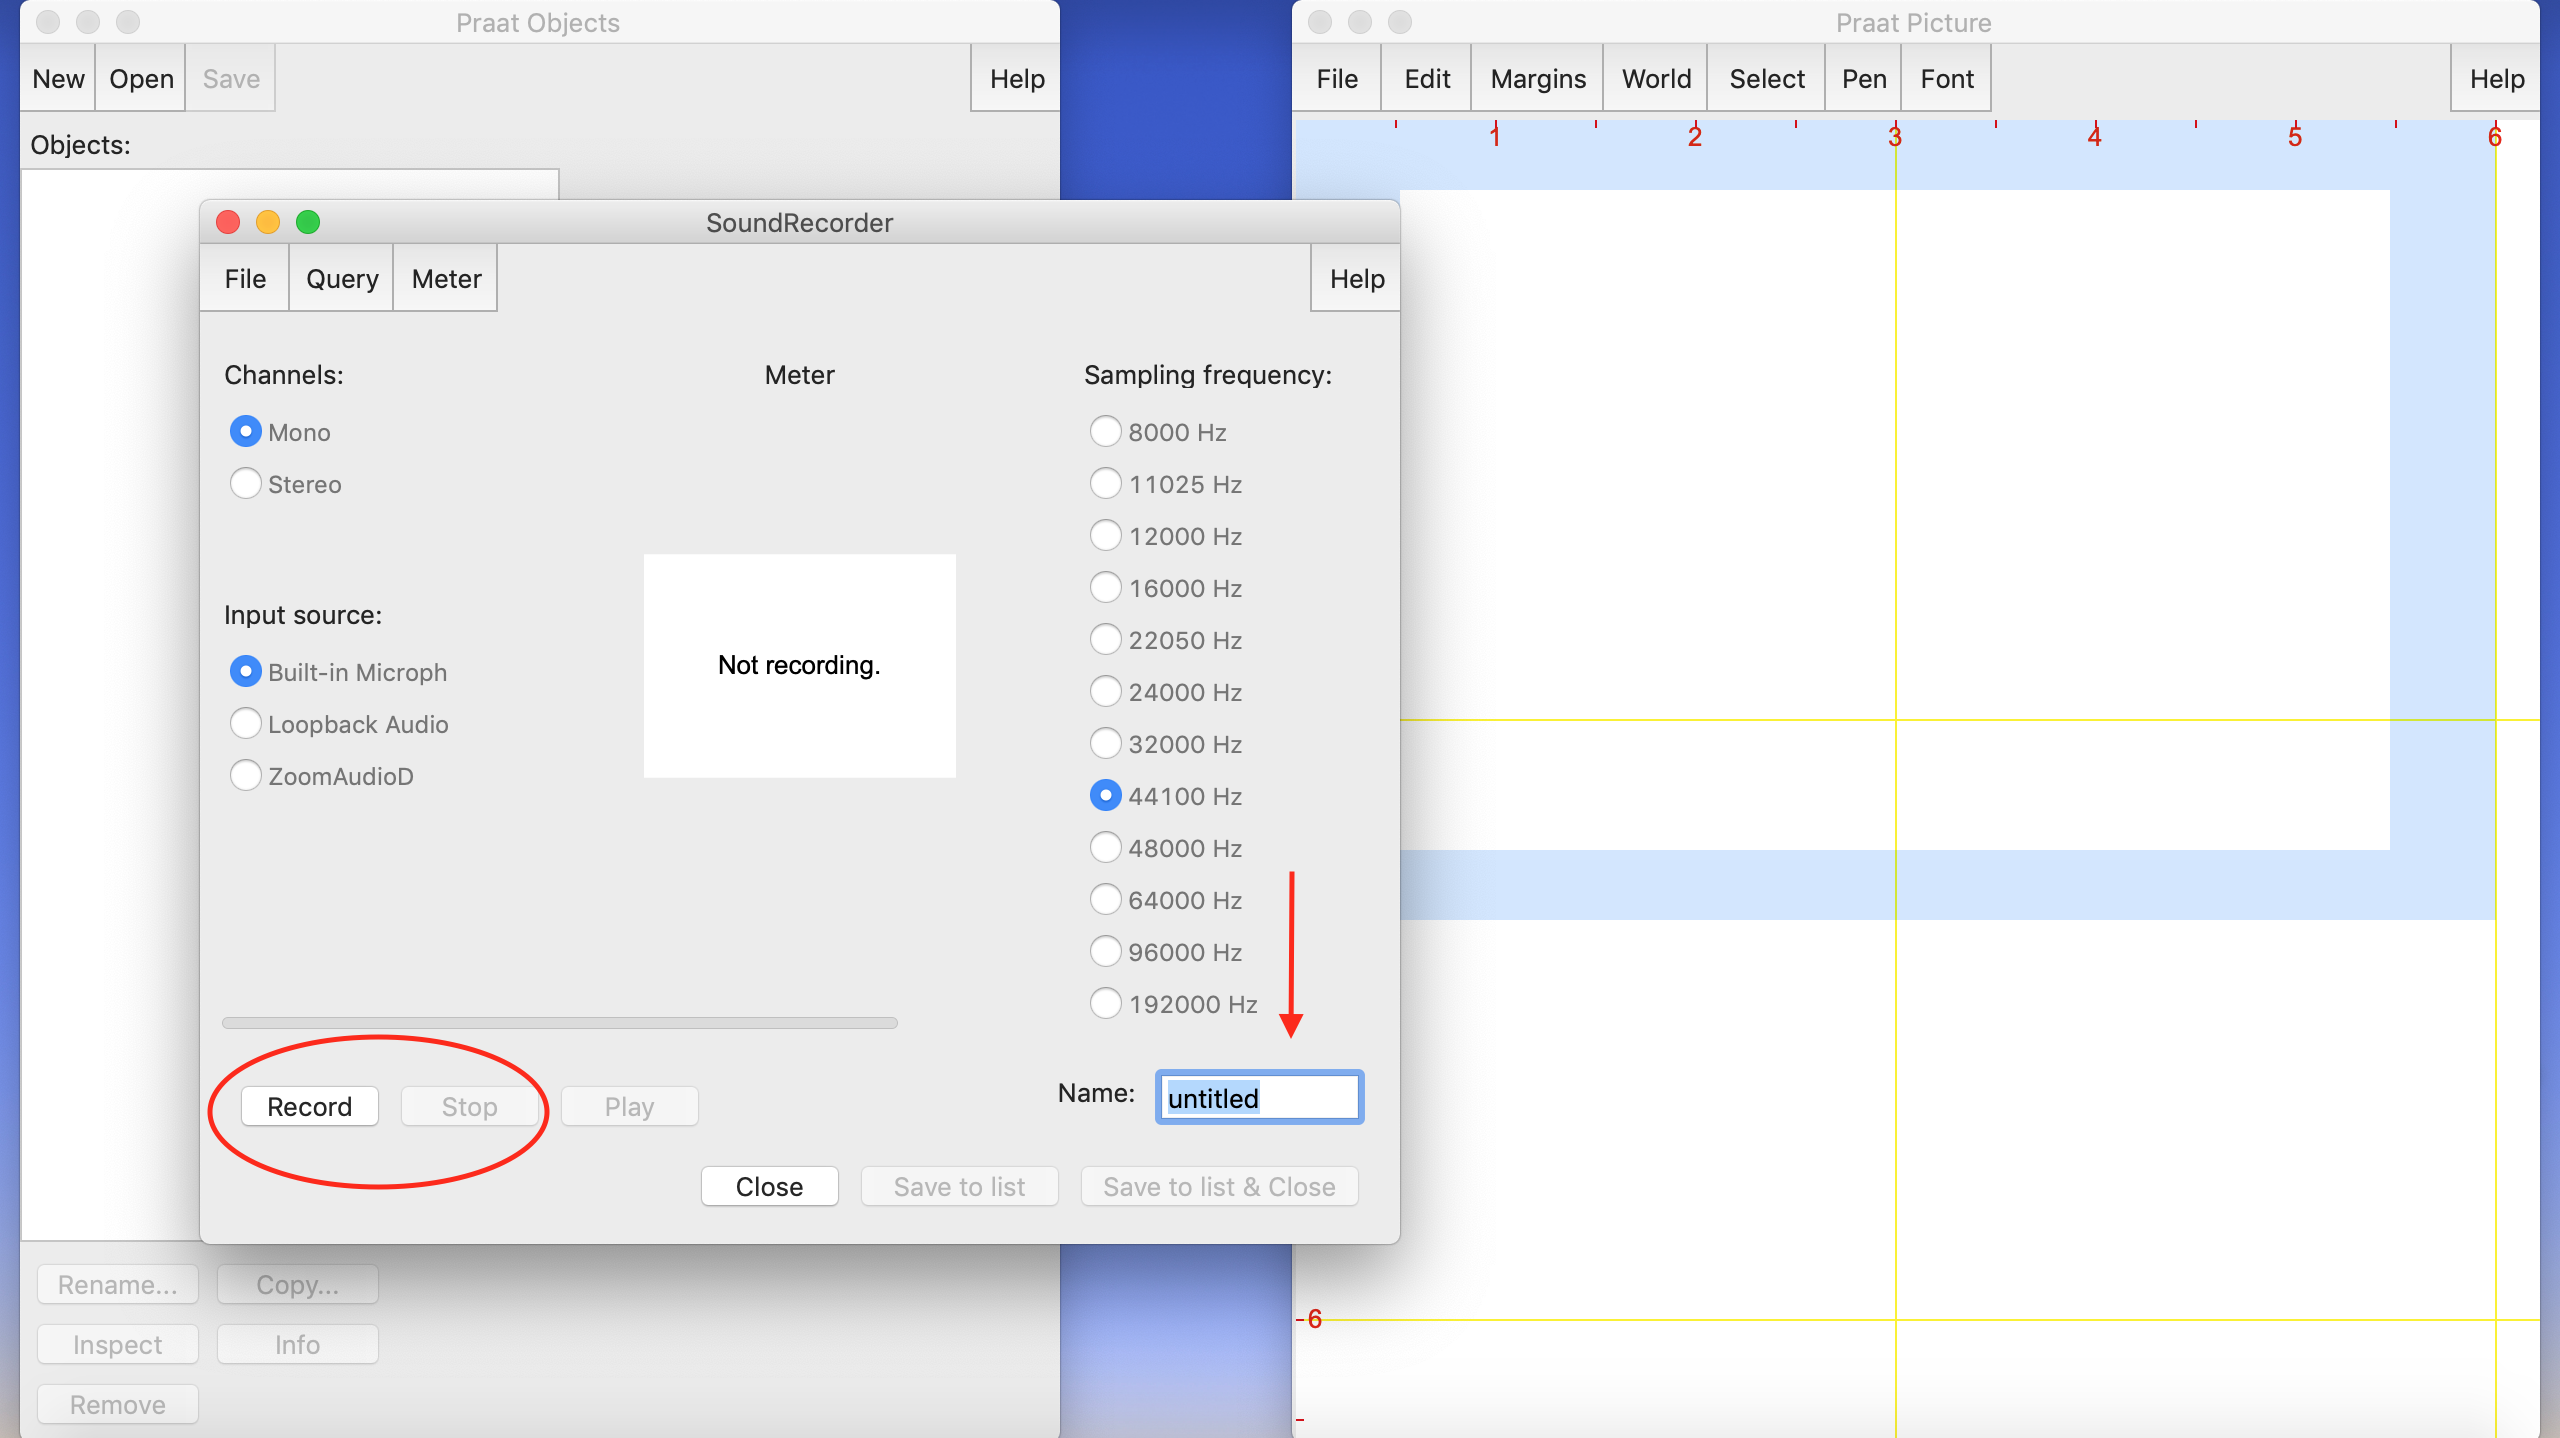
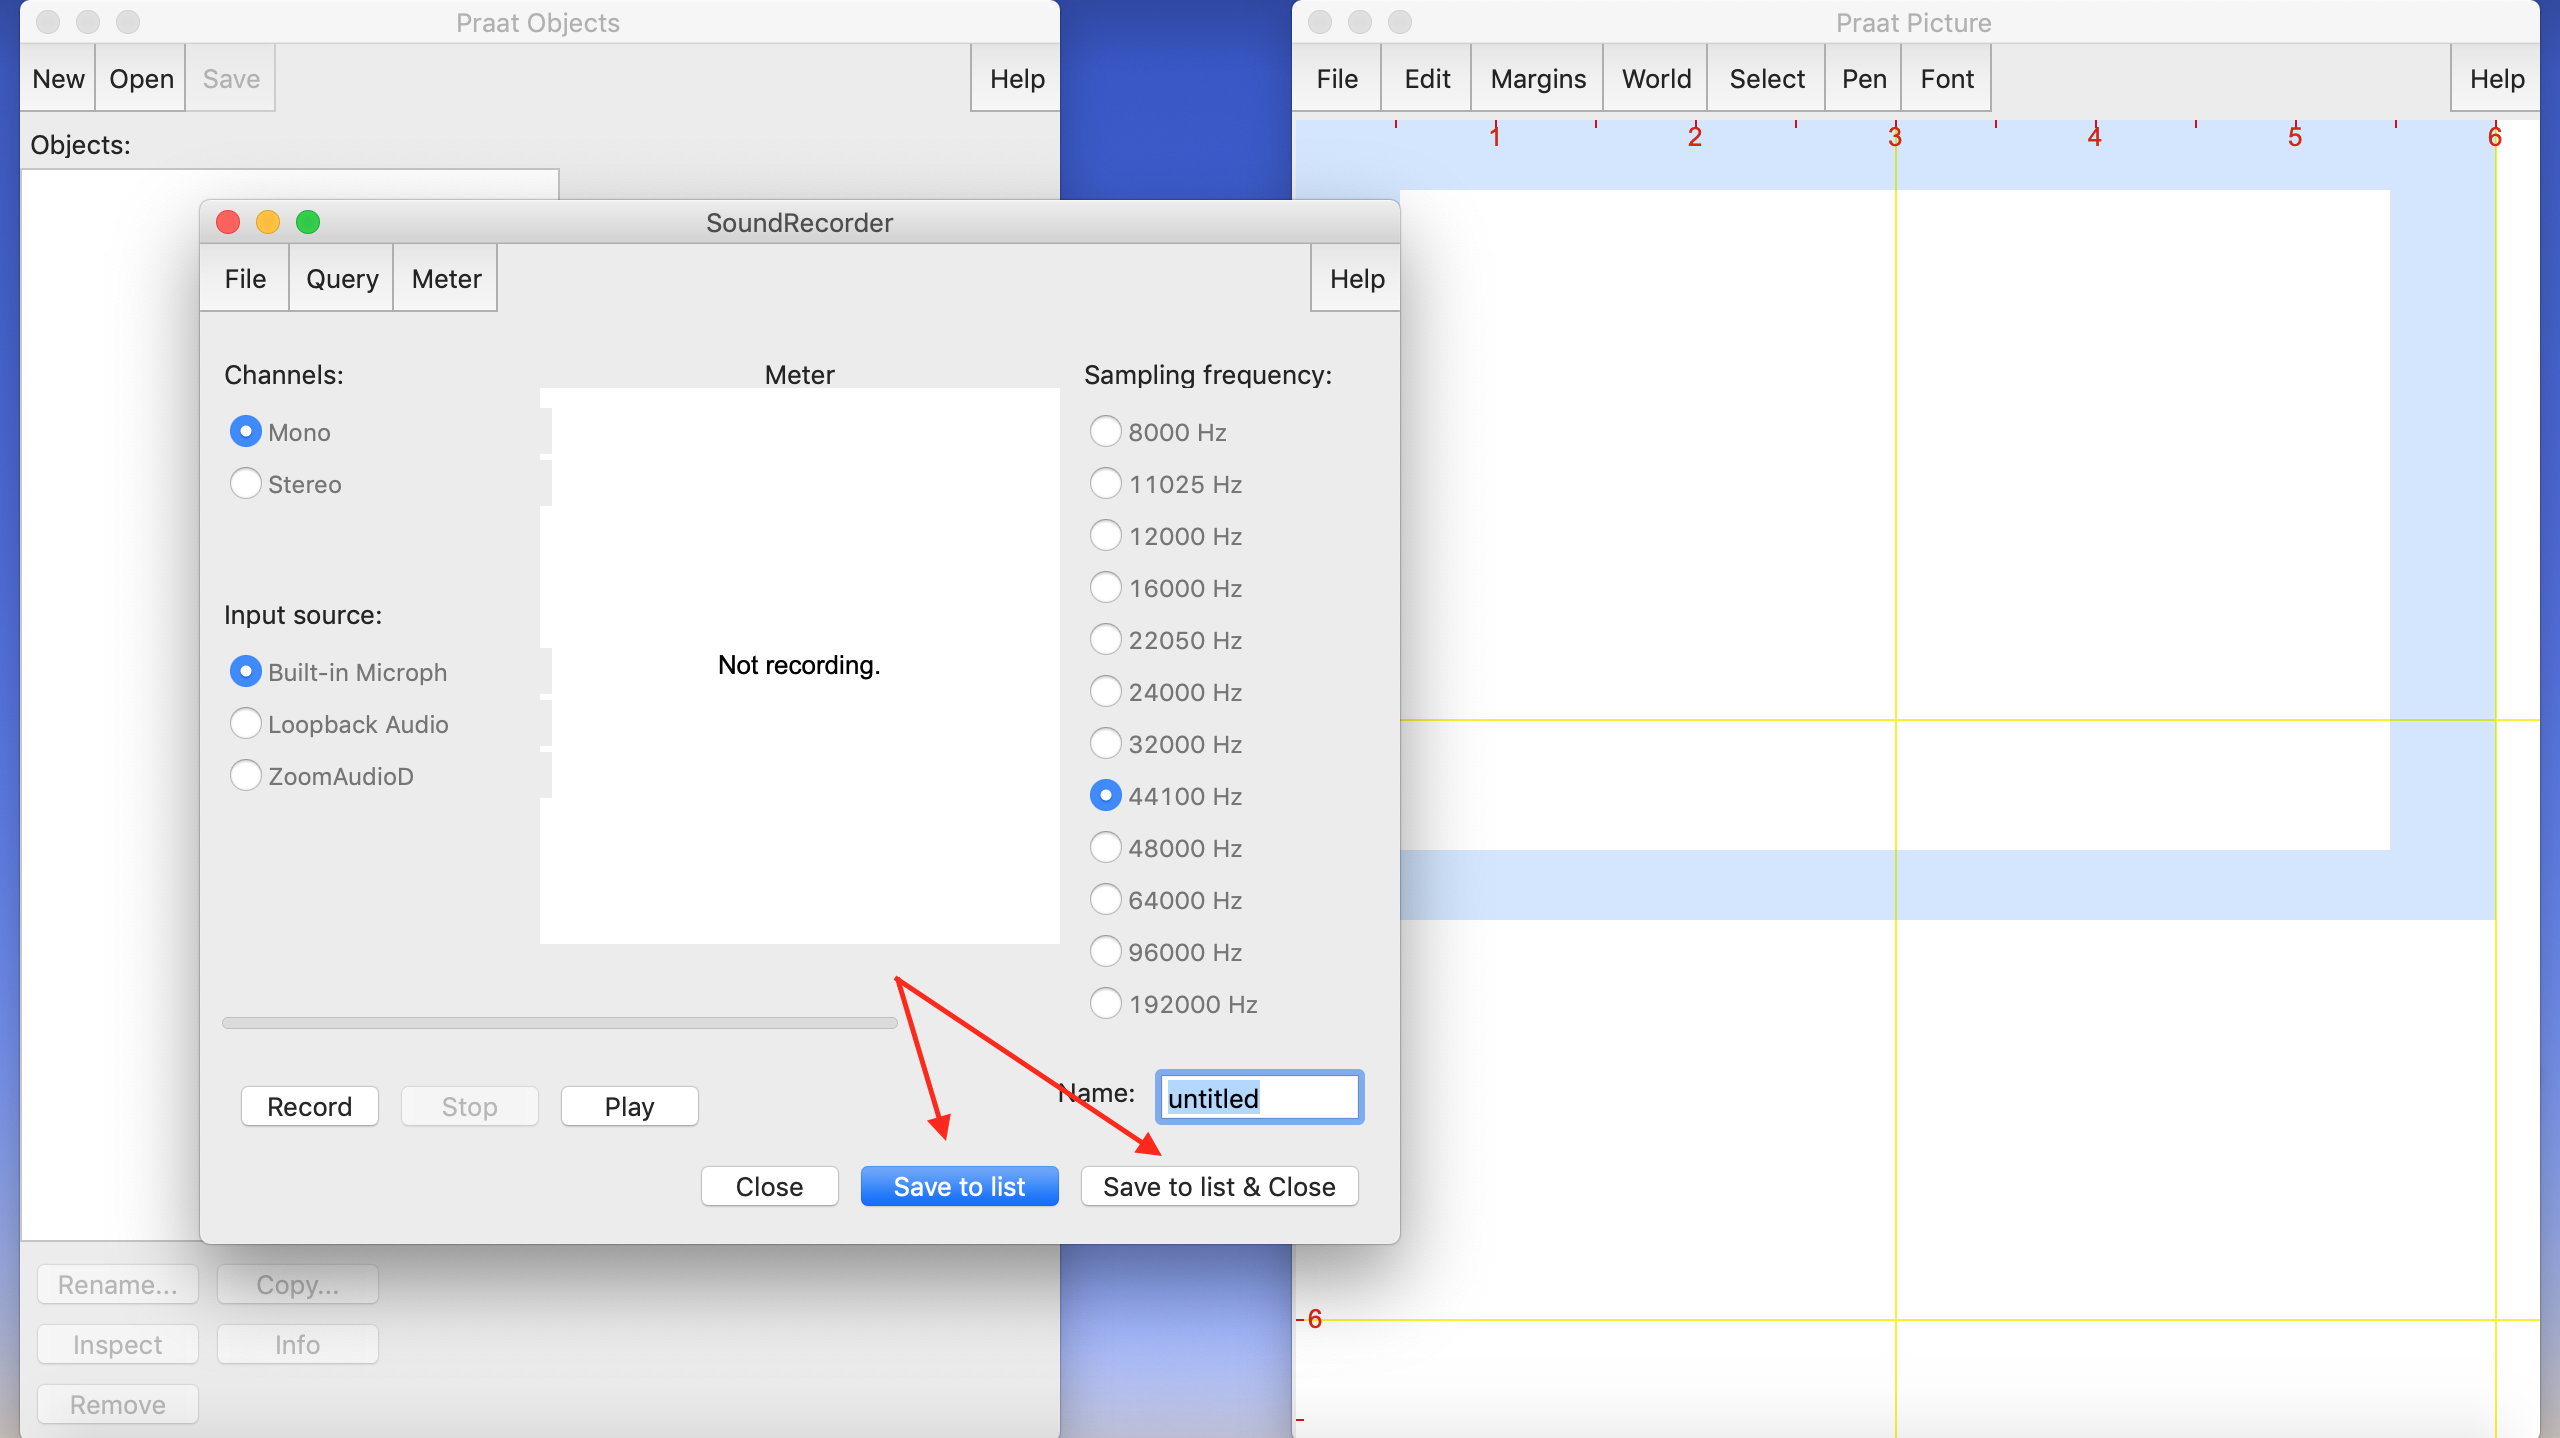
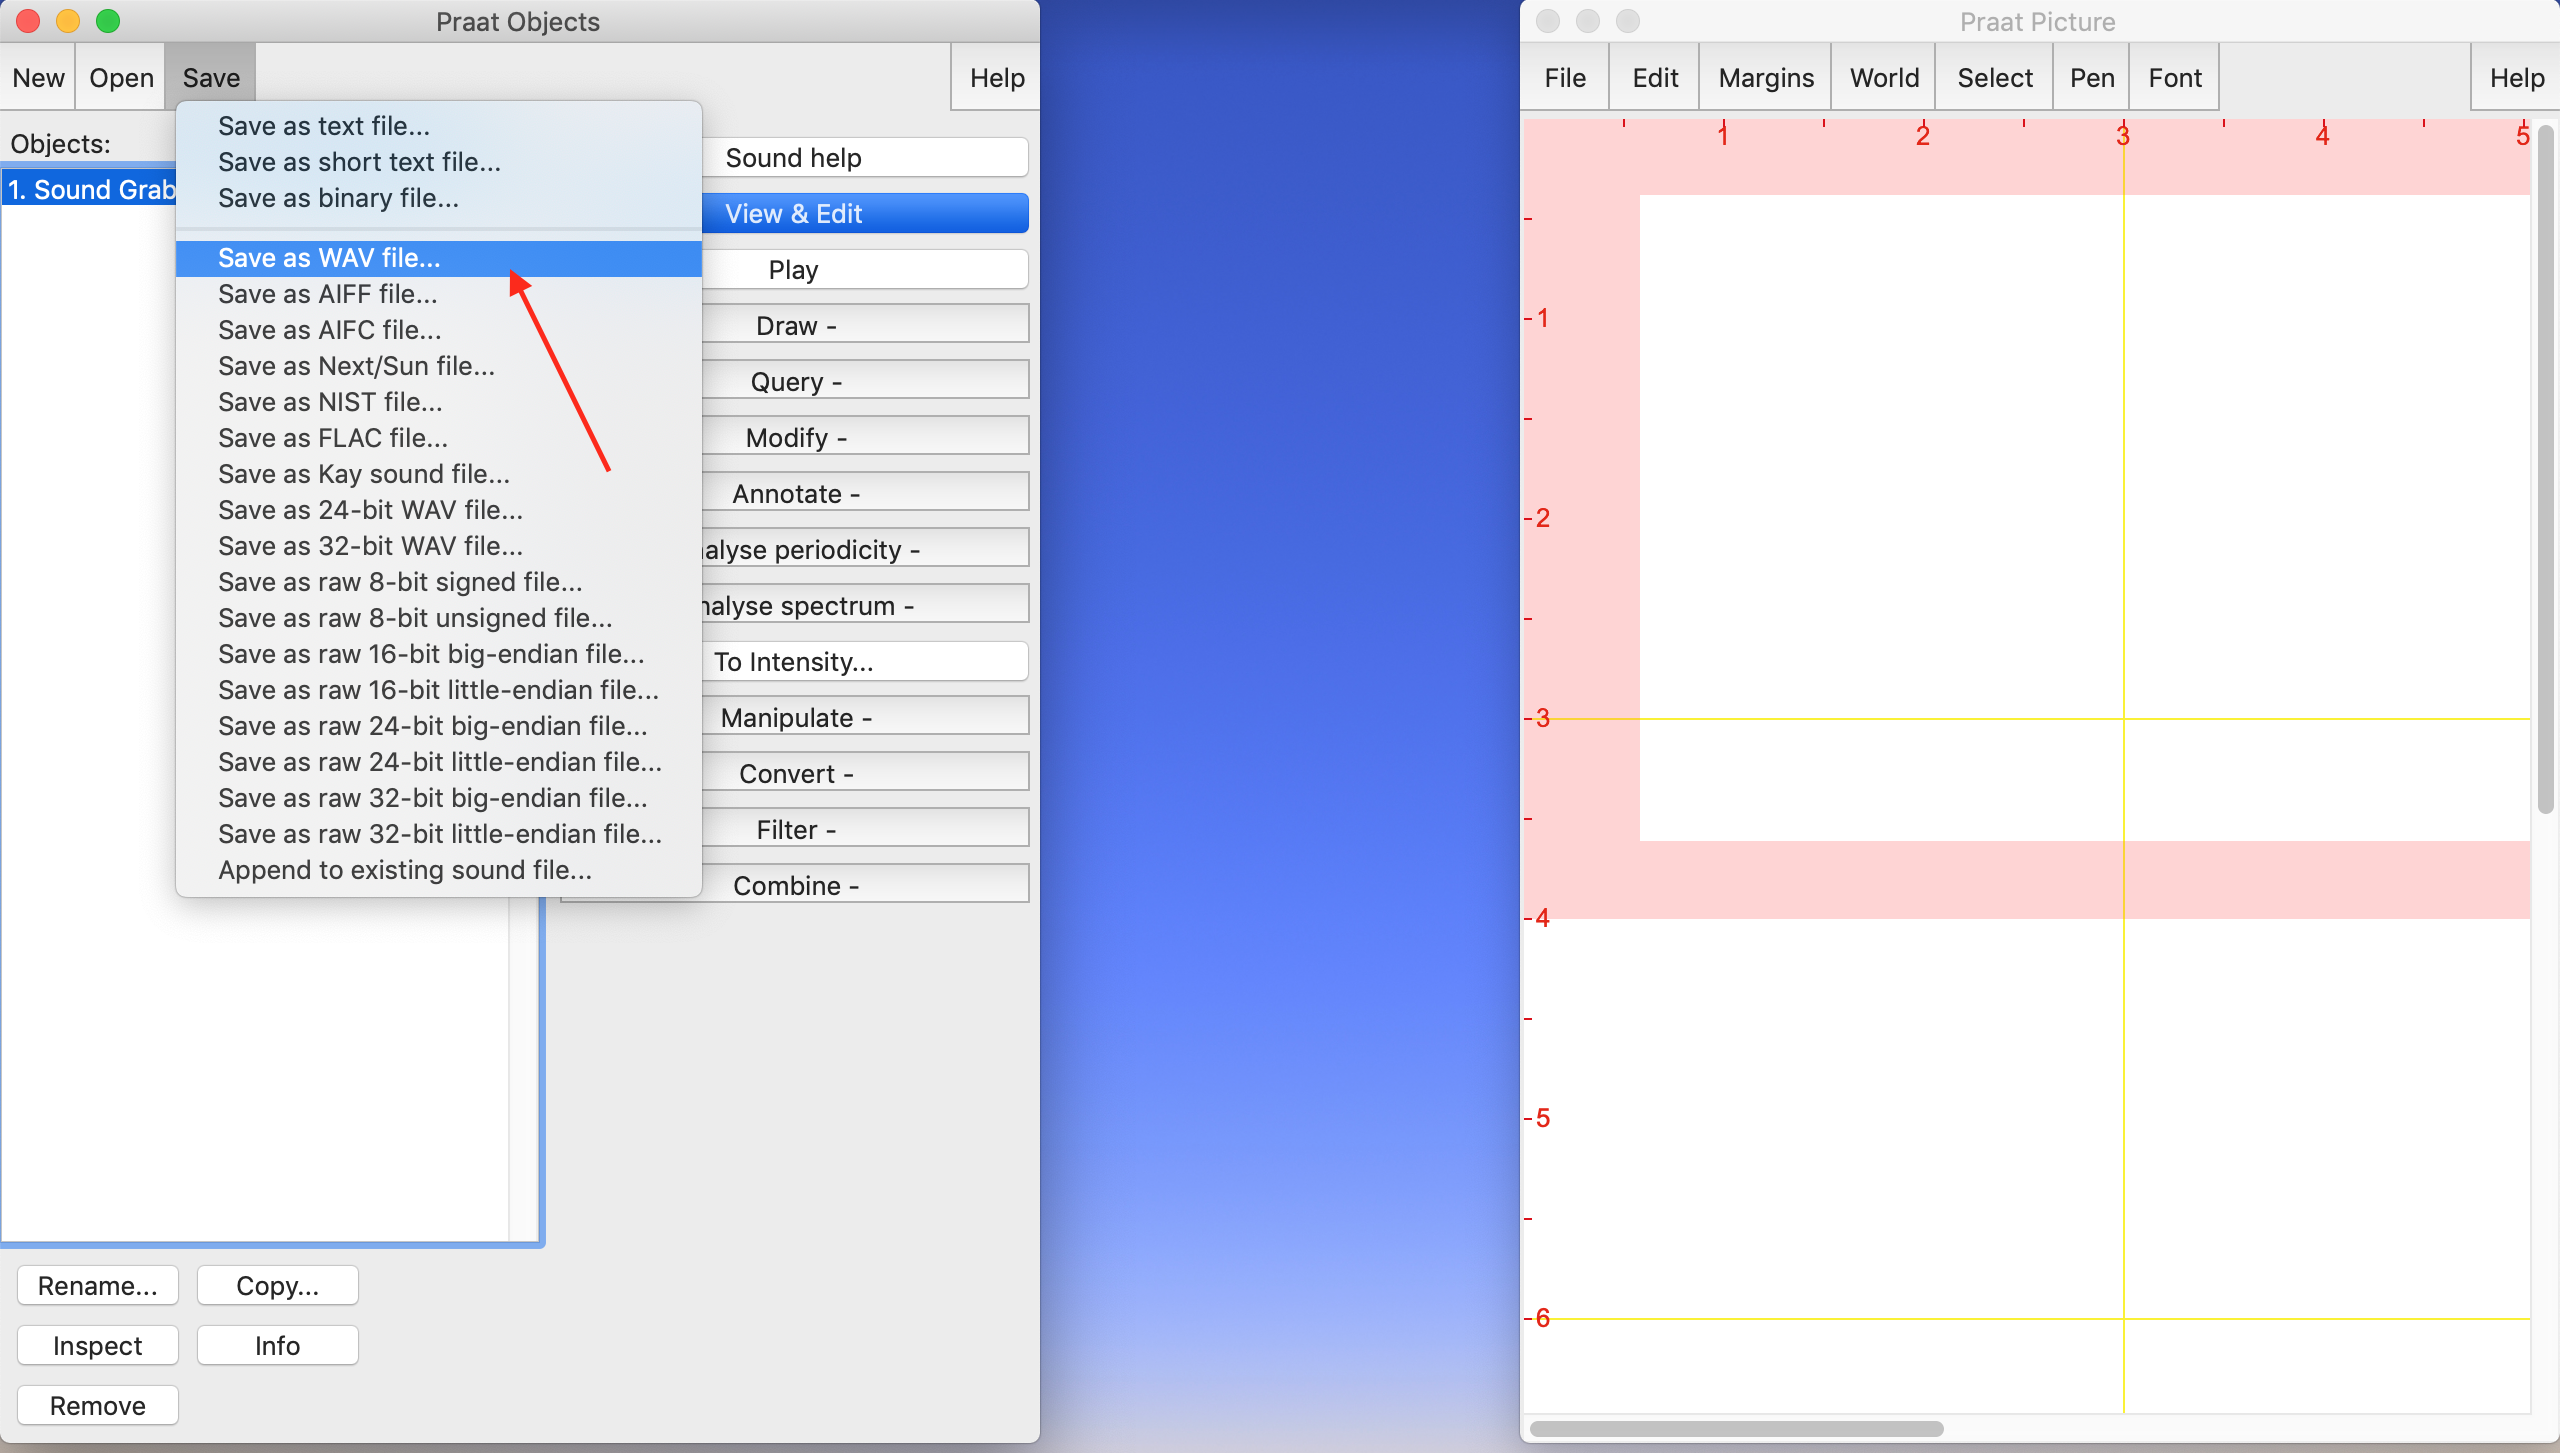
<?xml version="1.0" encoding="utf-8"?><feed xmlns="http://www.w3.org/2005/Atom" xml:lang="en"><generator uri="https://jekyllrb.com/" version="4.4.1">Jekyll</generator><link href="https://sarroniz.github.io/feed.xml" rel="self" type="application/atom+xml"/><link href="https://sarroniz.github.io/" rel="alternate" type="text/html" hreflang="en"/><updated>2025-10-05T22:56:29+00:00</updated><id>https://sarroniz.github.io/feed.xml</id><title type="html">Santiago Arróniz</title><subtitle>Welcome to my personal website. Based on [*folio](https://github.com/bogoli/-folio) design. </subtitle><entry><title type="html">Introduction to Unix</title><link href="https://sarroniz.github.io/blog/2023/intro-to-unix/" rel="alternate" type="text/html" title="Introduction to Unix"/><published>2023-07-15T15:09:00+00:00</published><updated>2023-07-15T15:09:00+00:00</updated><id>https://sarroniz.github.io/blog/2023/intro-to-unix</id><content type="html" xml:base="https://sarroniz.github.io/blog/2023/intro-to-unix/"><![CDATA[<ol> <li><strong>Introduction to Unix:</strong> <ul> <li>Unix is a powerful and versatile operating system known for its command-line interface (CLI) and multitasking capabilities.</li> <li>Key features of Unix include file management, process control, networking, and security.</li> </ul> </li> <li><strong>Terminal and Shell:</strong> <ul> <li>Unix commands are executed in a terminal, which provides a text-based interface.</li> <li>The terminal runs a shell, such as Bash (Bourne Again SHell), where you type commands.</li> </ul> </li> <li><strong>Navigating the File System:</strong> <ul> <li>Use the <code class="language-plaintext highlighter-rouge">ls</code> command to list files and directories in the current location.</li> <li>Use <code class="language-plaintext highlighter-rouge">cd</code> to change directories (e.g., <code class="language-plaintext highlighter-rouge">cd /path/to/directory</code>).</li> <li>Use <code class="language-plaintext highlighter-rouge">pwd</code> to print the current working directory.</li> </ul> </li> <li><strong>File and Directory Operations:</strong> <ul> <li>Create a new directory: <code class="language-plaintext highlighter-rouge">mkdir directory_name</code>.</li> <li>Create a new empty file: <code class="language-plaintext highlighter-rouge">touch file_name</code>.</li> <li>Copy files/directories: <code class="language-plaintext highlighter-rouge">cp source destination</code>.</li> <li>Move files/directories: <code class="language-plaintext highlighter-rouge">mv source destination</code>.</li> <li>Remove files: <code class="language-plaintext highlighter-rouge">rm file_name</code>.</li> <li>Remove directories: <code class="language-plaintext highlighter-rouge">rm -r directory_name</code> (be cautious with this command).</li> </ul> </li> <li><strong>Working with Files:</strong> <ul> <li>View file content: <code class="language-plaintext highlighter-rouge">cat file_name</code> or <code class="language-plaintext highlighter-rouge">less file_name</code>.</li> <li>Edit files: Use the text editor <code class="language-plaintext highlighter-rouge">vi</code> or <code class="language-plaintext highlighter-rouge">nano</code> (e.g., <code class="language-plaintext highlighter-rouge">nano file_name</code>).</li> </ul> </li> <li><strong>Redirection and Pipes:</strong> <ul> <li>Redirect output: Use <code class="language-plaintext highlighter-rouge">&gt;</code> to overwrite and <code class="language-plaintext highlighter-rouge">&gt;&gt;</code> to append (e.g., <code class="language-plaintext highlighter-rouge">echo "Hello" &gt; output.txt</code>).</li> <li>Redirect input: Use <code class="language-plaintext highlighter-rouge">&lt;</code> to read from a file (e.g., <code class="language-plaintext highlighter-rouge">cat &lt; input.txt</code>).</li> <li>Use pipes <code class="language-plaintext highlighter-rouge">|</code> to send the output of one command as input to another (e.g., <code class="language-plaintext highlighter-rouge">ls | grep keyword</code>).</li> </ul> </li> <li><strong>File Permissions:</strong> <ul> <li>Use <code class="language-plaintext highlighter-rouge">chmod</code> to change file permissions (e.g., <code class="language-plaintext highlighter-rouge">chmod 755 file_name</code>).</li> <li>Permissions are represented as three sets of characters: owner, group, and others (e.g., <code class="language-plaintext highlighter-rouge">rwxr-xr-x</code>).</li> </ul> </li> <li><strong>Process Management:</strong> <ul> <li>View running processes: <code class="language-plaintext highlighter-rouge">ps</code> or <code class="language-plaintext highlighter-rouge">top</code>.</li> <li>Terminate a process: <code class="language-plaintext highlighter-rouge">kill PID</code> (replace PID with the process ID).</li> </ul> </li> <li><strong>User Management:</strong> <ul> <li>Add a user: <code class="language-plaintext highlighter-rouge">sudo adduser username</code>.</li> <li>Delete a user: <code class="language-plaintext highlighter-rouge">sudo deluser username</code>.</li> <li>Change user: <code class="language-plaintext highlighter-rouge">su username</code>.</li> </ul> </li> <li><strong>Package Management (Linux-specific):</strong> <ul> <li>Package managers install and manage software packages on Linux.</li> <li>Common package managers include <code class="language-plaintext highlighter-rouge">apt</code> (Ubuntu, Debian), <code class="language-plaintext highlighter-rouge">yum</code> (Red Hat, CentOS), and <code class="language-plaintext highlighter-rouge">dnf</code> (Fedora).</li> </ul> </li> <li><strong>Getting Help:</strong> <ul> <li>Use <code class="language-plaintext highlighter-rouge">man</code> to access the manual pages for commands (e.g., <code class="language-plaintext highlighter-rouge">man ls</code>).</li> <li>Online resources like tutorials and forums are valuable for learning Unix.</li> </ul> </li> </ol> <p>Remember, Unix has a vast array of commands and features beyond what’s covered here. This tutorial provides a foundation for getting started, but continued learning and practice will help you become proficient in Unix. Good luck!</p>]]></content><author><name></name></author><category term="cl"/><category term="tutorial"/><category term="code"/><summary type="html"><![CDATA[A basic tutorial to Unix for Computational Linguistics]]></summary></entry><entry><title type="html">Recording with PRAAT</title><link href="https://sarroniz.github.io/blog/2023/recording-with-praat/" rel="alternate" type="text/html" title="Recording with PRAAT"/><published>2023-03-15T18:49:00+00:00</published><updated>2023-03-15T18:49:00+00:00</updated><id>https://sarroniz.github.io/blog/2023/recording-with-praat</id><content type="html" xml:base="https://sarroniz.github.io/blog/2023/recording-with-praat/"><![CDATA[<h2 id="recording-a-new-audio-with-praat">Recording a new audio with PRAAT</h2> <ol> <li> <p>First, make sure you have a microphone connected to your computer. You can use a professional microphone, but if you do not have one of those, you can use your headphones’s microphone instead. Avoid recording with the computer’s built-in microphone, unless you are sure it is a very good one.</p> </li> <li> <p>To record a new audio with Praat, go to “New” &gt; “Record mono sound”.</p> <p><img src="/assets/img/PRAAT3.png" width="100%" height="auto"/></p> </li> <li> <p>A new window will pop up. Leave the default settings, and give the file a name. Then, click “Record” to start recording and “Stop” when you finish.</p> <p><img src="/assets/img/PRAAT4.png" width="100%" height="auto"/></p> </li> <li> <p><strong>Don’t forget to save the file before you close the window!</strong> PRAAT does not automatically save anything. You can either “Save to list” or “Save to list &amp; Close”. This step will only save your file in the left panel, but you still need to save it in your computer (see step 5).</p> <p><img src="/assets/img/PRAAT5.png" width="100%" height="auto"/></p> </li> <li> <p>Finally, to save the file in your computer, click the file’s name on the left panel, and then click “Save” &gt; “Save as WAV file”.</p> <p><img src="/assets/img/PRAAT7.png" width="100%" height="auto"/></p> </li> </ol>]]></content><author><name></name></author><category term="phono"/><category term="tutorial"/><summary type="html"><![CDATA[How to record audio using PRAAT]]></summary></entry></feed>